What tools, spares and supplies would the perfect cycle touring or bikepacking toolkit contain?
Is it even possible to curate such a kit?
If it is, which products have earned the strongest reputation for reliability on worldwide bike trips?
And finally – which of those items should make it into the portable toolkit you’ll be packing for your next bikepacking trip or cycle tour?
These are the questions I want to explore in this detailed post on the subject of toolkit assembly for bike touring and bikepacking.
Note that if you have a non-standard bicycle configuration, such as a Rohloff hub or Pinion gearbox, hydraulically-actuated brakes, a Gates belt drive, or a very old bicycle with long-obsolete parts, etc, you will of course need to consider the servicing needs of these unusual components separately. That, unfortunately, I cannot help you with (touring bikes generally don’t have unusual components anyway).
For everyone else, however, you’ll be able to use this guide to assemble a toolkit tailored to your bike and plans, throw it into one of your interestingly-shaped bags, set off on your ride… and hope you never need to use it!

What Not To Forget About Bike Tools
Let’s take a step back for context. (I ask my readers to do this in all my gear-related articles.)
Take the following example:
You might believe that the function of a puncture repair kit is to repair a puncture.
But it would be more accurate to say that it is the person using the puncture repair kit who repairs the puncture.
The kit’s function is to allow that person to carry out the repair.
My point?
Tools are dead weight unless you know how to use them.
If you don’t know how to replace a broken spoke, and you aren’t bringing any spare spokes, do you need to pack a spoke key?
If you do know how to replace a broken spoke, and the breakage happens on the drive side of the rear wheel (as it usually does), do you know how to remove the cassette from the freehub in order to access the spoke in question?
Have you packed a cassette removal tool for this eventuality?
And if you’ve packed a cassette removal tool, have you also brought a chain whip and an oversize wrench?
Really, though?
You can bring great clarity to the subject of toolkit assembly for bike touring and bikepacking by imagining, in detail, the various scenarios in which you’d need a toolkit, and how those scenarios would play out.
Returning to the above example, my usual approach is to carry one spoke key, 3 spare spokes, and a lightweight cassette tool designed to be used with a 1‑inch wrench. If a spoke breaks, I strap up the broken spoke with Gaffa Tape, ride on to the next town, borrow a wrench from a random stranger, and use this technique to get the cassette off without a chain whip. In this way I know I can replace a spoke at relatively short notice without carrying any heavy tools at all (a chain whip alone is at least a ¼‑kilo of redundant steel).
So, as you read through the list of tools below, I invite you to consider which repairs you would be able to carry out on your own, and cross-reference this with the tools you put on your own list.
You might also consider making a list of the repair skills you need to practice before you set off. The resulting kit will depend on the skills you already have and what you’re prepared to learn.
It will also depend on the circumstances of your trip – most impotantly, duration and remoteness.
Right! Context set, let’s have a look at common tools and repair/maintenance scenarios in more detail.
Why Different Bike Tours Need Different Toolkits
There are of course some predictable, everyday scenarios that will involve your toolkit, no matter where you’re going bikepacking or cycle touring, or for how long. These include:
- Pedal removal/refitting (particularly before/after transporting a bike by plane)
- Drivetrain maintenance and adjustments, eg: chain lubrication, gear indexing
- Cockpit tweaks to improve fit and/or comfort, eg: saddle tilt, cleat position, etc, especially on a new bike
- Puncture repairs (it’s gonna happen)
- Brake shoe adjustment and renewal
Less common but entirely likely issues on long trips include:
- Gear/brake cable renewal
- Tyre repairs (e.g. after a sidewall split or blowout)
- Bearing overhaul or renewal (pedals, wheel hubs, bottom bracket, headset)
- Drivetrain component replacement (chain, cassette, chainrings, jocky wheels, derailleurs, etc)
- Wheel repair, rebuilding & truing (including freehub overhaul/renewal)
And of course, there are any number of unpredictable failures you simply won’t be able to prepare for. If your frame snaps at the rear drive-side dropout (this has happened to me and plenty of others), you won’t be unpacking a portable welding inverter to fix it. You’ll be hitching a ride or walking to the next town, and hoping the local welder has worked with the thin and (from a welder’s perspective) very delicate steel of a bicycle frame tubeset before.
The lesson here is that you can’t pack tools and spares for everything. More important is your attitude towards adversity and problem solving.
Your toolkit, then, should strike a balance between your most likely needs and your willingness and ability to get your hands dirty, all within the limits of practicality.
It hopefully goes without saying that a bikepacker or bike tourer has limited space in their luggage for infrequently-used items such as tools, and will consequently be looking to keep the weight of their toolkit as low as possible.
My rule of thumb: pack the minimum number of tools for the maximum range of procedures you’d be happy to carry out on the side of the road.

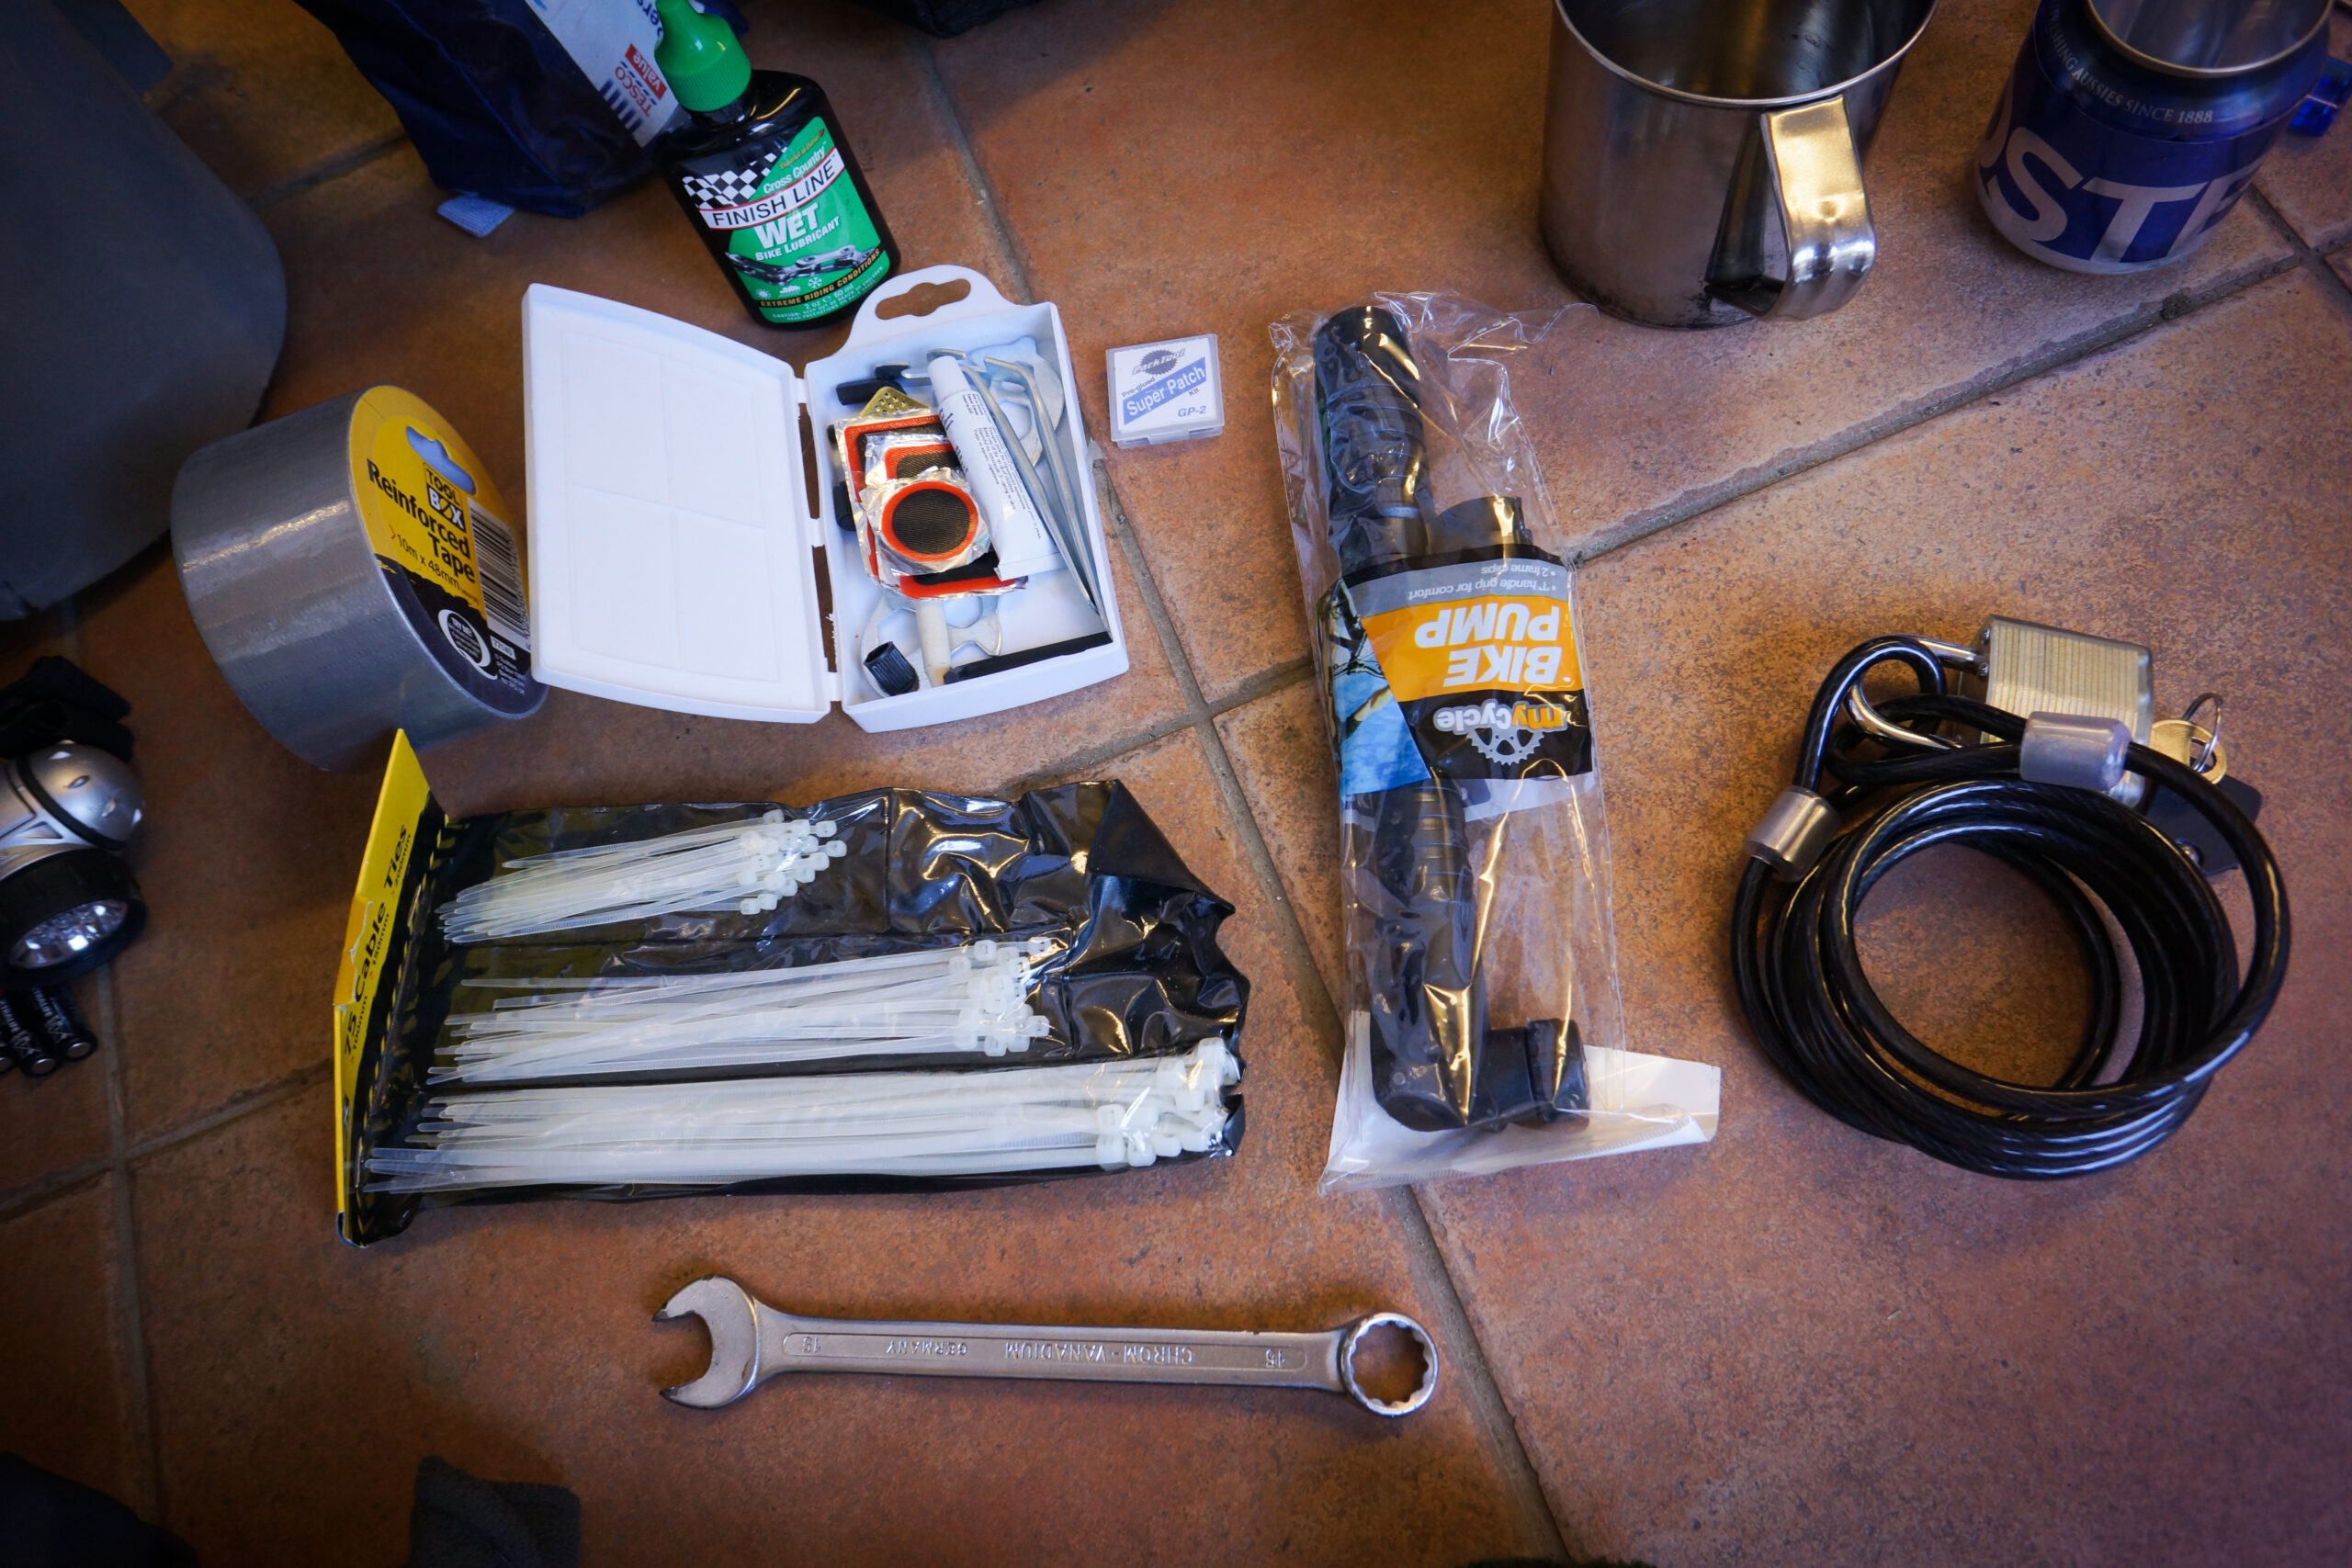
So What’s Inside A Typical Bicycle Traveller’s Toolkit?
Let’s get stuck into the list of tools and spares to pack for a bike tour or bikepacking trip of any length or location.
I’m assuming you’re riding a relatively modern touring bike or bikepacking rig, and have a basic grasp of routine maintenance and repair skills. (If you don’t, scroll down to the last section of this article for some learning resources.)
The list is divided between the bare essentials, ie: things you should probably be packing for even the shortest trips, and additional items for longer or more challenging rides.
For each tool in the list, and where appropriate, I’ve mentioned specific makes and models I’ve seen recommended over the years as truly tried-and-tested pieces of kit for long and arduous cycling adventures, plus links to popular online retailers that stock it.
Tools for Cycle Touring & Bikepacking: The Bare Essentials
1. Emergency teabag.
Step one in fixing unexpected mechanical problems: sit down and get a brew going.
Recommendation: PG Tips 1‑cup biodegradable pyramid bag.
2. Traditional puncture repair kit
Your bike won’t roll unless there’s air in the tyres. You can take the tyre off with your bare hands if you need to, and find air compressors that’ll work with Schrader valves (that’s the large type) at any petrol station or mechanic’s shop, but unless you can seal the hole in the tube, you won’t be going anywhere. Puncture repair kits are pretty generic, but avoid the cheapest (and chuck out the included tyre levers).
A basic kit should contain:
- Rubber patches (range of sizes, including an uncut piece of rubber which can double for a tyre patch),
- Vulcanising solution (i.e. rubber glue),
- Small square of sandpaper to aid adhesion.

Recommendation: Weldtite (CRC*, Wiggle*)
Note: Running tubeless tyres to save weight? Ironically, many long-distance riders carry an innertube as backup. In which case, you also need another repair kit for when that goes. So the only weight you’ll really be saving is rotational.
3. Instant stick patches
These don’t require glue and are good for a quick fix or if you’re out of traditional patches, but only if you get a brand that actually works (most don’t). If you’re an ultralight bikepacker on a short trip, you might risk ditching the traditional kit and relying on these alone to save weight and space.

Recommendation: Park Tool Super Patch GP‑2 (CRC*, Wiggle*)
4. Actual tyre levers
Throw away the bendy tyre levers that came with your puncture repair kit. You’ll find out if you try to use them that they’re actually made of cheese. Instead, get some durable ones that will last. Remember that many popular touring tyres are tough to mount and dismount, especially the wired varieties; the same is true of tubeless knobblies.

Recommendation: Park Tool TL‑1.2 (CRC*, Wiggle*) or Schwalbe (Amazon*)
5. Multi-tool
This is a single compact lightweight tool that performs many tasks and is going to become very familiar to you, so don’t skimp on it. Packing all this utility into one package saves a lot of weight and space, but comes with some inevitable compromises. They’re available with a bewildering range of functions, but a good multi-tool for touring and bikepacking should include the following features (and preferably not much else):
- Allen (hex) keys – the range should not just fit every bolt head on your bike, usually 2, 3, 4, 5, 6 and 8mm, but have the length and leverage to actually work in the field
- Chain breaker – one that allows both breaking and re-coupling the chain (even if you have a quick-link, you might still need to repair or shorten the chain)
- Screwdrivers – both Phillips (cross-head) and flat blades
- Spoke keys – most tools include several size options; use a Sharpie or some nail varnish to mark the one that fits your spoke nipples
- Wrenches/spanners – 8, 9 and 10mm box heads are generally most versatile; again, make sure that you pack individual extras for any weird-sized bolts on your bike
- Emergency pedal wrench – 15mm is standard; alternatively, get pedals with a hex bolt fitting on the inside end of the axle
- Torx keys – if appropriate to your bike; often seen in conjunction with disc brakes

Recommendation: Topeak ALiEN II (CRC*, Wiggle*)
6. Mini tyre pump
This is another critical tool, so don’t be a cheapskate: buy one that will quickly get your tyres up to pressure and stand the test of time. Cheap and cheerful ones are inefficient and prone to breaking. Get one with a gauge so you can run optimal pressures and adjust accurately as the terrain changes, ensure it’s compatible with your valve type, and consider a spare O‑ring for long trips. (Tip: Don’t mount it to your frame unless you want it to disappear while you’re getting your groceries.)
Recommendation: Topeak Road Morph G (CRC*, Wiggle*)

Spares For Cycle Touring & Bikepacking: The Bare Essentials
As well as the above tools, I’d suggest packing a small selection of spare parts and consumables for common maintenance (or potentially catastrophic repairs) in the short term:
- Small bottle of chain lube – pack wet or dry lube as appropriate to your destination, e.g. Finish Line wet (CRC*) or dry (Wiggle*)
- Range of stainless steel nuts, bolts, and washers – in M5 and M6 sizes or as appropriate to your bike; spray with 3‑in‑1 (not WD-40 which evaporates) to prevent corrosion and keep in an airtight container
- Spare inner tube – make sure the size and valve type matches the ones already installed, and that it has a valve cap (and locking nut if of the Presta type)
- Spokes – two rear drive-side (by far the most commonly broken), plus one rear non-drive-side and one front. Get these from your wheelbuilder if you’re having wheels built, otherwise make sure you order the right lengths/gauges/types, which will probably vary
- Spare chain link – if you bend a link and don’t have a spare, you’ll be down a few gear ratios for the rest of the ride
- Replacement brake shoes or shoe inserts for your specific brakes – mud and grit in bad weather can destroy brake shoes fast

Additional Tools & Spares For Ever-Longer Bike Trips
Depending on the length of your trip and your expected distance from decent bike shops, you’d do well to pack some or all of the following tools and spares:
- Cassette remover – critical to replace rear driveside spokes, service the hub (eg: renew the bearings), or replace the freehub body; you’ll need a wrench and chain whip (or wrap your existing chain round a chair leg in a rag) to use it, or check out the clever lightweight ‘Next Best Thing 2′
- Cone spanners for cup & cone hubs – make sure you get the correct sizes for both front and rear, which may differ
- Bottom bracket shell removal tool – because, there being so many bottom bracket styles, that bike shop in Bishkek might not have the right one for your bike
- Crank extractor/puller if applicable to your bike – again, make sure you get the correct type for your crankset
- Extra long 10mm Allen key – for removing Shimano freehub bodies if applicable to your bike; use your seatpost as an extension tube if you need extra torque
- Complete set of spare bearings for hubs, pedals, headset and possibly bottom bracket
- Spare chain – already shortened to correct length,
- Brake inner cable
- Gear inner cable (unless you’re Rohloff-ing)
- Small pot of all-purpose synthetic bike grease – e.g. Weldtite/TF2 (CRC*), decanted e.g. into a film canister or pill bottle
- A few cable end caps (CRC*) taped to a bit of card
Other Handy Accessories & Consumables
These are general-purpose items that many riders find themselves using in a wide range of scenarios. Again, I suggest you tailor the following list to your trip and available pack space:
- Plastic cable ties (zip ties) – a range of sizes and lots of them,
- Gorilla Tape (Amazon*) – this stuff holds the universe together; take several metres wrapped around your seat post, spare lighter, chain lube bottle, film canister, etc,
- PTFE tape (Amazon*) – again, a short length wrapped around something, for sealing threads that are prone to working loose over time, e.g. racks and bottle cage mounts,
- A pair of work gloves (Amazon*) for greasy work and to double up as emergency riding gloves – not latex gloves, which disintegrate over time and/or may cause allergic reactions,
- Stainless steel hose clamps – in two sizes, for unexpected repairs; carry by attaching to your rack tubing (small) and seatpost (large) (which also serves to mark your preferred seatpost insertion point).
Note: many of these items will be available from your local hardware store; it’s probably cheaper than buying online too.
And there we have it – a template for a comprehensive fix-anything toolkit for your next bike trip.
All you need now is a handmade retro tool roll to store all the bits in and you’re ready to go! (Just kidding – a plastic bag and a rag work fine.)
Bonus #1: Bike Trip Survival Items Which Are Neither Tools Nor Spares
Just because I’m nice, here’s an extra list of ‘survival items’ for general emergencies of the kind you might encounter on a bike trip (of which some are likely more ‘urgent’ than others):
- Mini sewing kit – for when you suffer clothing failure in embarassing locations,
- Extra-long USB extension lead – for that hostel emergency when the power socket is nowhere near your bed,
- Mini lighter – for when you lose or soak all the others,
- Lipbalm – for example Vaseline, which when smeared on cotton wool doubles up as a really good firelighter,
- Small USB powerbank – for when your phone’s dead and you really need to send that SMS to your mum,
- Tweezers,
- Foil emergency blanket,
- Emergency motivational letter to self (plus digital version if you have a smartphone)!
Bonus #2: How To Get Over Your Fear Of Bike Maintenance & Repairs
Bicycles are extraordinarily simple machines. That is part of their beauty, and you’ve little to lose by mucking in and seeing what happens. The worst case scenario is wheeling or driving it to the local bike shop because you can’t figure out how to put something back together. And it’s better to do that before you set off than when you’re already on a trip.
But if you’re lacking in confidence doing your own repairs and maintenance, the best thing you can do is enlist a bike-savvy friend to help you through the basics.
You might also sign up for a bike maintenance class at a local bike shop, helpfully befriending the staff in the process. You’ll probably be surprised at how many bicycle repair and maintenance courses are being run in your local area. Many of these are free to attend, being used as promotional events for local bike shops. Some local authorities provide free cycle training, including basic maintenance.
Another helpful exercise for peace of mind on a really long ride is to take your bike apart completely and put it back together (before you leave, I mean), ideally with the help of a friend or otherwise by following the abundance of guidance available on the internet.
In the process, you’ll find out what tools you need and how to use them, as well as what you’re comfortable with tackling yourself in terms of maintenance and repairs.
There are many good books on the subject of bicycle repairs and maintenance, and of course there is no end of information online. To save you some dredging, though, the most comprehensive and long-standing starting points for mechanical knowledge are Park Tool (who also have a great Youtube channel) and the website of the late Sheldon Brown.
That really is your lot! Anything else you’d pack in your toolkit that hasn’t been mentioned here? Let us know in the comments.

Bogged down in research for your next big bicycle adventure?
I wrote a whole book to help with that. How To Hit The Road is designed to be read at your leisure, making planning a bike tour simple and achievable, no matter the length, duration or budget. Available globally as an ebook or paperback.
Something to add?